Julie Clark had her narrow boat stretched by 6ft; read about the process & gain advice if you’re thinking of stretching your own boat!

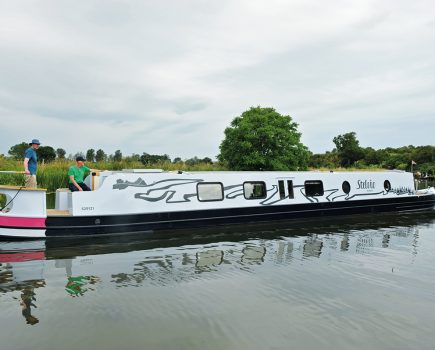
I had always been content with my 34ft Colecraft narrowboat and taken jibes such as ‘are you saving up for the other half?’ on the chin. She was big enough for me and I enjoyed many adventures and miles of cruising exploring our canals and rivers.
After ten years I started to think I needed a little more space, things needed updating and my trusty gas fire was starting to get disapproving comments as to its safety, plus I wanted a little more internal comfort. A change was afoot. I started to look for another boat to suit my need but after months of trailing around looking at boats within my budget, I came back to the idea of having Jade stretched. I had a friend in Napton who had had 20ft added to her boat and so the concept had already been planted.
After numerous enquiries I found a boatyard in the Midlands with an excellent reputation for steelwork and internal fit outs, who were happy to take on the project, and so Jade was dispatched to them last January, by road, to fit in with their schedule. Time was on my side since I had the summer planned crewing on another boat with St Pancras Cruising Club crossing The Wash. Requirements were discussed, a price agreed, and so I left my pride and joy in their capable hands.

The process of stretching a canal boat
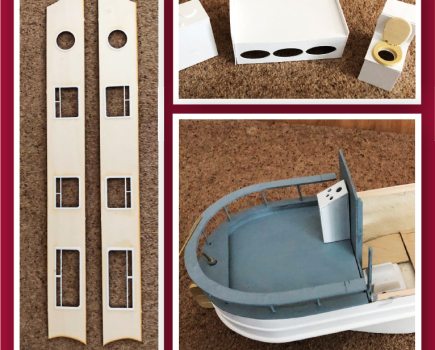
I have to say that the sight of one’s boat chopped in two is not for the faint hearted! Jade was expertly cut along the sides of the windows and the front shunted forwards to allow for the extra 6ft of new steelwork (which I felt was enough for my engine size) to be inserted. I was pleased to see at this stage the bodywork of the boat was braced to prevent any potential warping. New window apertures were cut and the original windows refitted while new hopper windows were installed in the galley, these are completely removable so when it is hot they can be taken out to create open side hatches.
Of course when I embarked on this project I envisaged a straightforward cut and shunt; however, as things always do, the project grew. It was pointed out that the galley and side panelling were rather the worse for wear and might be replaced. I liked this idea; I therefore agreed to more of a refit that I had originally planned.
A beautiful new galley was built in oak with a small butler’s sink. All of the panelling was replaced with oak veneer panels giving the boat a light and updated look with tongue and groove installed below the gunwales.
Prior to this, the steelwork had been spray foam insulated and ballast – in my case a load of old bricks, put beneath the flooring. One advantage of replacing the panelling was that all new electrics could be installed giving me LED lighting throughout and new 240V sockets in convenient places together with new Victron inverter/charger.
Gradually, everything came together, the flooring went down, a multi-fuel stove set in place in the centre of the saloon area for maximum warmth dispersal. A dinette was built at the front of the boat creating a wonderful space for fine dining or a convenient workspace. When I have a guest to stay, it converts to a comfortable bed and now two armchairs sit either side of the fire in the saloon. The gas and water were reconnected, with the water pump now being easily accessible, and a new Boat Safety Certificate in place.
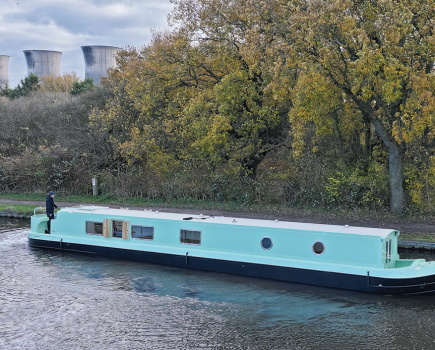
Outside the boat you honestly cannot see the join, it is the first thing everyone asks, but it is truly invisible! The handrail on the roof was matched up beautifully, rubbing strakes joined – so my bow strakes are now extra long – and a new chimney installed for the stove. She is now a beautiful 40ft boat except for the paint job. I agreed to have the paint on new section matched to the old. It didn’t work and I now have a half-painted boat which will incur further costs I had not envisaged having the whole boat repainted.

Tips to consider if you want to stretch your narrow boat
Having this done work was a real learning curve. However much you may trust your boat builder, you do need to keep your finger on the pulse.
Knowing exactly what you want is essential – even when the goalposts change, and inevitably they do, so keep discussions open and ask to be informed at every stage of the work. Having a builder who understands your anxieties and will listen is extremely helpful, after all, what is obvious to them may not be to you. Keep a list of the jobs as they are completed and don’t be shy of telling your builder of your expectations which may be different from theirs. Visit regularly to keep up with general maintenance of your vessel, especially if it is away for any length of time. You may need to run the engine from time-to-time so you don’t, as I did, return to take the boat and find the starter motor seized, starter battery completely dead and engine dials no longer working! Ensure everything on the boat has been thoroughly tested, gas, electrics and water, and bilge pumps, which was disconnected. This simple act will help prevent snags later appearing such as the screw I found through a water pipe which led to my saloon floor flooding because no one had actually tested the plumbing.
Remove everything from your boat, this is a big and mucky job so empty it completely. Having the boat lengthened will affect the trim, so be sure to ask the yard to adjust this as well as moving the centre line hoop position – I now have a boat with the centreline three feet out of place. But, hey ho, another job to be done this year.
I have to say that if I knew then what I know now, I would still have gone ahead with the transformation.
Next time, I will be ready for twists and turns involved in such a project and try to take on a little more responsibility.
For now, after nine months I have a boat that I love and couldn’t wait to try out.
And when the little irregularities are finally sorted, I will be even more delighted with Jade and her invisible join…


Image(s) provided by:
Archant